Tuesday, February 26, 2008

Lip Therapy

Out of all the parts of my face, I think my lips are my most neglected part. Chapped, dry and dark lips - not a pretty sight at all. Especially now that summer's fast approaching, we need to make sure that our lips are just as protected as the rest of our body. Besides, if we have a regular face care regimen, or an eye care regimen, then why should we not have a lip care regimen as well?

For dark lips, check out Godiva's Lightening Lip Gloss. It says it lightens both your lips and nips so they're dual-purpose. It's super cheap too, at just 90 bucks or so. After a week's time, your lips will be noticeably lighter in color. Another cheap solution to dark lips is good ol' Petroleum Jelly. Apply this on your lips to restore your pigmented or discolored lips to its natural pinkish state.

To protect your lips against further pigmentation, apply lip balms with SPF in it. I really love Neutrogena's Lip Moisturizer with SPF. Not only does it keep my dry lips in check, it also contains SPF 15 to prevent my lips from darkening even more. I use this even when I'm just staying at home because even the rays that come from TV or computer exposure are harmful and can cause skin darkening. Nivea Lip Balm and Chapstick also contain SPF to shield your lips from sun damage. You can't go wrong with Kiehl's Lip Balm #1. This famous lip balm feels creamy and luxurious and it also has SPF 4. If you want something with higher protection, head on over to VMV. VMV Armada Moisturising Protective Lip Balm contains an SPF of 60! You can't beat that. Before you head off to the beach, you might want to pick up Hawaiian Tropic SPF 45 plus Aloe Vera Sunblock Lip Balm. It's moisturizing and it's waterproof so you can lounge around in the beach all day without worrying about dry, dark lips.

If you want something more tinted, there are a variety of lipglosses and lipsticks out in the market that also contain sun protection ingredients. For a cheap gloss with SPF, try E.L.F's Super Glossy Lip Shine. Their glosses come in a variety of shades that also contain SPF. Another brand that carries tinted lip treats with SPF is Smashbox. Their Tinted Treatment Lipstick line comes in five different shades aside from having SPF 15. Elianto's Spa Lipstick line does not only contain SPF, it also has Vitamin E which gives anti-aging benefits.

To combat dry lips, I love using the ever-famous Smith's Rosebud Salve. I even use this on other dry parts of my skin sometimes, such as my elbows or heels. My mom swears by Blistex when her lips get uber-chapped and dry. On regular days she uses Burt's Beeswax Lip Balm or Vaseline Lip Therapy.

Once a week, I slather on YSL's Exfoliating Lip Balm. When I first heard about this product, I was really amazed. Wow, these people really think of everything! In just one treatment, all my dry, peeling skin were removed. I do that at night and then I put on my favorite lip balm before I sleep. When I wake up in the morning, my lips are softer and more moisturized.
Monday, February 25, 2008

Makeup tips from Myca Feng

Hello all! I'd just like to share some makeup tips I got from the makeup workshop I attended a couple of weeks ago.

Eyebrow Shaping Rules:
1) The beginning of the brow should be directly in line with the tear duct. So chop off anything that goes beyond that. To align your tear duct and eyebrow more clearly, use a pencil and place it on a vertical position at the end of your tear duct. You'll be able to see then whether your eyebrow goes beyond that.

2) Look straight ahead. The highest point of the arch should line up with the outer side of the iris. The top and bottom edge lines should be parallel until the hight point and then taper to a thin edge.

3)Use the same pencil and line it up approximately 45 degrees, beginning at the side of the nose through the outer corner of the eye. Your brow should end there.

4) For perfectly groomed brows in a second, try combing through them with a brush to flick away any powder or foundation.

Working with different types of eyes:
1) To make wide-apart eyes appear closer, use more intense eyeshadow colors near the inner corner of the eyes. Line the eyes completely, both top and bottom, from inner to outer corners.

2)For close-set eyes, do the opposite. Apply the most intense color near the outer corners of the eyes. Line top and bottom of eyes in any color, but begin drawing a quarter of the way out from the inner eye. Dust a highlighter just below the outer corners of lower lashes to call attention to the outside of eyes. Brush mascara to upper and lower lashes.

3) If you have small eyes, apply a medium-toned shadow to the crease. Use a soft-colored liner on the top and bottom lash lines, extending the top line across the entire lash line and the bottom line from just under the iris to the outer corner. Apply light shadow on the eyelids, then more intense shades in the creases.

4) For those with prominent eyes, apply a medium to dark shadow on the crease and the hooded area. Sweep a lighter shadow on the brow bone and on the inside corner of the eye. Draw a very thin line along the top lashline to keep the eye looking open and smudge. Line upper lash line only. Gradually soften shadow as you near the brow.

5)Finally, for deep set eyes, draw a fairly thick line all the way across the top lash line with a brown or black pencil. Apply a medium to dark shadow on the lid and in the crease. Dark colors make features recede. So if you want to hide something, like prominent lids, use dark colors.

Other tips:
1)Try to use correcting bases. Correcting bases can help in evening out skintone. Green bases helps lessen the appearance of severe skin redness, orange for dark spots like undereyes, around the lips and the the nose, while violet correcting base helps brighten dull pale colored skins.

2) Concealer is always AFTER foundation.

3) Throw away mascaras that are older than three months. To preserve your mascara, try not to pump the brush in the container because this speeds up the drying process. To rescue drying mascaras, immerse them in hot water, making sure the lid is tightly sealed. That will help melt the dry mascara.

So there! Some handy tips you might want to keep in mind after Anyway, for those interested, Myca Feng will be having another makeup workshop on March 23. For more information, check out makeupbymyca.multiply.com!

Sunday, February 17, 2008

My first ever mineral makeup haul

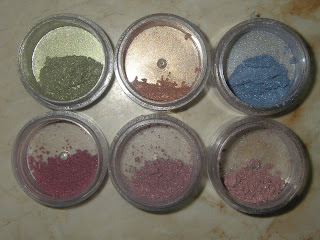
I've heard soOoO much about the wonders of mineral makeup I thought I'd finally give it a shot. I ordered from Monave, since they have a local reseller and I've gotten some really good reviews about this brand. A few weeks ago, I finally got my first ever mineral makeup samples. Yahoo my first ever foray into the world of mineral makeup.

Top row: Monave Multi Purpose Minerals, L-R: Lime, Gold Salmon, Wave
Bottom Row: Monave blushes, L-R: Silk Garnet, Star Lily and Mystic Rose

Monave foundation, L-R: Hyeyeon, Teporah, Saturnina, Canela

Initial observations:
1) Monave's foundations are some of the creamiest-looking foundations I've tried. The coverage and staying power are unbeatable. The finish is really flawless and beautiful and the foundation stays on from the moment you apply it until you have to take it off. The reviews really weren't exaggerated. The foundations come in loose powder for light to medium coverage and concealer powder form when you want heavier coverage. Still, whether you opt for the loose powder or the concealer form, you won't feel as if you have too much makeup on. In fact, the foundation goes on lightly, allowing your skin to breathe and making you feel as if you have almost nothing on. The color range is fantastic too. You can also mix and match the foundation colors to match your skin tone more precisely. As morenas, I suggest checking out foundation colors in Hyeyeon, Teporah, Saturnina and Canela.

2)I'm in love with the Angel setting powder. It gives a smoother, more matte finish to your look.

3)The blushes and shadows are super pigmented, so you need very little per application. I love it because the colors are great and they're very economical to boot.

4)The delivery of the makeup samples was hassle-free. I gave my orders on a Friday morning and got the samples on Saturday afternoon. The reseller, Sophie, was very accommodating too. She answered my questions thoroughly and handled my orders quite efficiently. She even threw in an illuminizer as a freebie.

All in all, I'd say Monave is an essential element for your Mineral Makeup stash. If you want to venture into mineral makeup but don't know where or how to start, try starting with Monave. They have a very informative website, beautyandminerals.multiply.com which contains just about all kinds of information you'd need about your mineral makeup needs. They also give out samples and packages so you can see which colors are right for you. Ordering is hassle-free too and you're guaranteed to get your orders ASAP.

Tuesday, February 12, 2008

Rant or Rave: Kiehl's Blue Astringent Herbal Lotion

Rant or Rave is a new section here in the blog, inspired by Girltalk's Rant and Rave thread. I'll basically just rant or rave about a new beauty product or service I've recently encountered. Trying out the best products out in the market is really a trial and error process. Sometimes you'll just have to do a bit of sifting around to get a diamond in the rough. For this entry, I'll both rant and rave about Kiehl's Blue Astringent Herbal Lotion.

Rant: What I didn't like about this is that it's too drying! It says on the label to put it on oily areas. Since I have oily skin all over, that's precisely what I did after cleansing. Yikes, my face ended up feeling so dry. I think it's because of the alcohol content. You can actually smell the alcohol when you put it on. Immediately after applying this, my face felt too tight and stretched. I didn't experience any major breakouts, thankfully, but if you have particularly sensitive skin, this might be too drying for you. I tried this for several days consecutively and my skin became a bit flaky, which was evident when I was using my moisturizer. You might want to just use this every other day instead of every day. It says on the label too that this product is good to use after shaving so you might want to recommend this to your boyfriends or your dads.

Rave: Now, what I do love about the product is that it completely eliminated this one pimple that was just about to erupt. It's similar to spot treatments or pimple drying treatments in that sense. It might be handy to keep around just in case a pimple is threatening to appear.

I like Kiehl's on the whole, especially its famous Lip Balm #1. Generally, if your face is not an oil mine, you might want to skip this product. Actually, you might want to just consider toners that are alcohol-free as alcohol strips away natural oils that our skin needs.

Friday, February 8, 2008

From Cheap to Steep: Bronzers

From Cheap to Steep is a new section in the blog where I'll feature different products that are identical to each other, except of course, when it comes to price. So for this first ever post, Ill put something about bronzers.

From Cheap....
Ever Bilena Advance Bronzing Powder


A perfect skin tone enhancer that gives sheer and shimmering effects
Retails at: P200.00

to Not-So-Cheap...
The Body Shop Brilliance Powder


A lightweight sparkle powder with shimmering pearls that provides a natural-looking sun-kissed finish for the face and body. Available in a shimmer or matte finish.
Retails for: P1,195.00


to Steep!

Lancome Star Bronzer Magic Brush for Body and Face


This innovative brush dispenser is convenient and portable for quick touch-ups on the go. Combines tinting and shimmering agents to enhance the skin's natural colou. Sweep on a shimmering, sun-kissed glow, from head to toe, at the press of a button.

Retails at: P2,595.00


Thursday, February 7, 2008

Green eyeshadow

Yey my first ever EOTD and semi-tutorial!

Since it's Chinese New Year, I thought I'd experiment with the color green, since green can stand for good luck and more fortune. (Besides, the color green really pops out on morena skin tones).

Now, for the EOTD and semi-tutorial. This is really very basic eye makeup, as in anyone can do it.


1. Prep your eyes with eye primer. If you have oily lids, eye primers work wonders. They make colors pop out and they make your eyeshadow stay on longer. I use MAC Prep+Prime in Medium. I've been wanting to try Artdeco eye primer but they're always out of stock. Urban Decay Primer Potion, supposedly the king of eye primers, is unfortunately unavailable here in the Philippines. If you don't have eye primer, you can always use your concealer and just top it off with loose powder.

2. Brush light green eyeshadow all over the lids.

3. Take a darker shade of green and brush on the outer corners of the eye. So the effect is like lightest green from the inner corners until it becomes dark green at the outside. Blend blend blend. You can always layer it on depending on your taste.

4. Line your upper lashline with black eyeliner.

5. Take the light green eyeshadow and line your lower lash line, starting from the inner corner to the middle. Then take the dark green eyeshadow and line your lower lash line from the middle to the outer corner. I didn't have eyeliner in green colors so I just made do with the eyeshadows themselves.

6. Curl your lashes, apply two coats of mascara.

7. Don't forget to fix your brows and apply concealer if you need to.

There you go! Your simple Chinese New Year EOTD. Happy New Year everyone! I wish you all a happy and prosperous year ahead!

Makeup used:
MAC Prep+Prime in Medium
Lancome Color Focus in Enchanted April (light green)
Shu Uemura Pressed Eyeshadow in Olive (dark green)
Avon Glimmersticks eyeliner in Blackest Black
L'Oreal Volume Shocking Mascara